
Making a Cricut fall DIY door hanger is one of my favorite fall craft projects. I love making round wood signs period. They give you so much creative freedom.
It’s so easy to make a fall round wood sign that looks unique. But if you aren’t sure how to make one I have you covered. Or if you’re looking for inspiration, you’re in the right place.
I’ll show you how I made my Cricut fall round sign.
*Amazon affiliate disclosure: I am a participant in the Amazon Services LLC Associates Program, an affiliate advertising program designed to provide a means for me to earn fees by linking to Amazon.com and affiliated sites.
*Affiliate Disclosure: This post may contain affiliate links, which means I may receive a commission, at no extra cost to you, if you make a purchase through a link. Please see my full disclosure for further information.
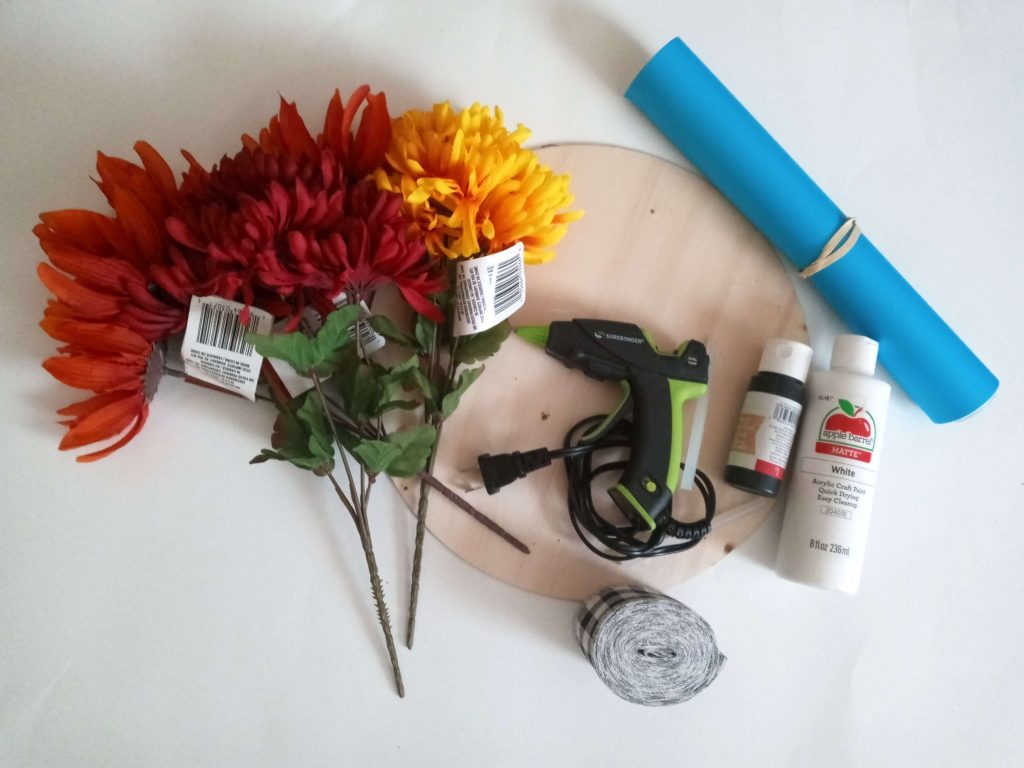
Supplies needed:
- 12″-15″ Round Wood
- White acrylic paint, or chalk paint
- Black acrylic paint, chalk paint, or black paint marker
- Stencil vinyl or removable vinyl
- Weeding tool
- Wired edge Ribbon
- Artificial fall leaves
- Artificial fall flowers
- Scissors
- Stencil brush
- A bristle brush, foam brush, or mini roller
- Transfer tape
- Hot glue gun
- Cricut Explore Air 2, Cricut Maker 3, Cricut Explore 3
- Cutting mat
How to Create a Cricut Fall DIY Door Hanger
Step 1: Paint the round wood

You can choose whatever type of paint you want. It’s completely up to you. You can even use exterior paint. In this tutorial, I am using white acrylic paint. You can use whatever type of brush you want.
To make the job go faster you can use a mini roller. I painted two coats on my round wood sign. You can paint the back as well. I recommend waiting until the paint dries before applying another coat.
So, your brush doesn’t dry put it in a plastic zip-lock baggie.
Related Post: How to Make a Christmas Glass Can
Step 2: Create your stencil

I use Oracle stencil vinyl. You can use whatever brand you prefer. Removable vinyl can be used as well. I like stencil vinyl because it’s not as tacky.
Here’s the link to the welcome stencil I made in the Cricut design space. Just to warn you the stencil I made is sized to fit my wood sign.
If you want to make it yourself, here are the steps:
- Measure the width of your wood for the stencil
- Choose your font and type in your phrase. Or download a fall SVG file for wood signs.
- Click on the left toolbar and click shapes. Then click on the square.
- Unlock the square by hitting the lock icon. This is so you can stretch it to any size.
- Stretch the square to cover your design
- Right-click your box and select move to back
- Make sure it fits your sign before cutting
- Now attach your box and phrase together
- Your letters should be the same color as your box if you attached it
- Now you are ready to cut!
Related: Cricut DIY Trick or Treat Bags
Step 3: Cut your stencil
Once you hit make it, your Cricut machine switches to cutting. If you’re using stencil vinyl switch the materials in your Cricut machine to stencil vinyl. In Cricut Explore Air 2 just turn the dial to custom. Then you’ll see the materials menu pop up in Cricut design space.
Place your vinyl onto your mat and load it into your Cricut machine. You can use a light grip mat. Now hit the start button on your machine.
Once it’s done, flip your mat over. Then remove the mat from the vinyl. It helps you to prevent your vinyl from curling.
Now you’re going to weed all the letters. But leave the centers of letters like o,e, etc. Don’t weed those.
Next cut a piece of transfer tape. Make it the size of your stencil. Place it onto the stencil. Then use a scraper to burnish it down. Now you’re ready to use your stencil.
Alternative method
You don’t have to use a stencil for the welcome phrase. If you don’t feel like painting you can just use permanent vinyl. But I recommend sealing the wood before adding permanent vinyl.
Sealing the wood first helps the vinyl to adhere better. But only do this step if you don’t plan to paint the welcome phrase.
If you don’t have a Cricut machine, Amazon and Etsy sell done for you stencils.
.
Step 4: Paint onto your Stencil

The next step is to place your stencil onto your wood sign. Make sure the white paint from the previous step is dry. Peel off the backing of your vinyl. Make sure the letter centers are on the transfer tape too.
You can use the hinge method if you prefer to place the stencil on your sign. Once your vinyl is on the wood, peel off the transfer tape slowly. Make sure the letter centers stay on your wood.
Make sure you have enough space around your stencil for errors. You don’t want any color paint going outside of the stencil. You can add painter’s tape to give you extra space.
Now it’s time to paint! The easiest method of painting with stencils is to use a paint marker. I’ve tried different methods. Paint markers are my favorite.
With paint markers, it feels like you’re coloring. You don’t have to worry about bleed through. But if you don’t want to use paint markers, here’s another way.
Use a stencil brush
I recommend using a stencil brush. Or a bristle brush that isn’t too big or wide. You want to paint in layers over your stencil. Don’t pour a ton on in one coat.
Lightly dab your brush in the paint. Then dab your brush up and down over each letter. Let it dry. Then apply another coat. Don’t worry if you don’t cover all the letters completely in the first coat. That’s what the second coat is for.
Once the paint is dry you can remove the stencil. When peeling off the stencil go slowly. You can even use scissors to help you peel it off in pieces.
Step 5: Add your bow and other elements

Now it’s time to add your other decorative elements. With my sign, I added a bow, artificial fall leaves, and artificial fall flowers. I got my leaves and flowers from the dollar store. The ribbon I ordered from Amazon.
I spent a lot of time last year figuring out how to make ribbons. So, thanks to YouTube I finally learned. Now that I know how it’s one of my favorite things to do.
If you don’t know how you can always get a ribbon maker. Or learn the way I did, through YouTube. Here’s a YouTube Ribbon tutorial for you, if you don’t know how.
I used a hot glue gun to add my bow and other items. You can add the bow first or your other items first. Personally, I find it easier to add the bow first.
But first practice how you want it to look. This way you won’t make any mistakes once you glue it on. The last step is for you to add your twine to the back of your sign.
For my sign, I didn’t use twine because my sign is very lightweight. I used a piece of my ribbon material instead. Regardless of what you use, add it to the back with a hot glue gun.
Now your Cricut fall sign is ready to go!

Related Posts
Free Printable Thanksgiving Tags
Fall Home Decor Finds Under $25
Free Fall SVG Files for Your Cricut Machine
Free Printable Home Organization Planner
Fall Preschool and Kindergarten Worksheets
How to Make Waterproof Stickers with Your Cricut
How to Create a Pumpkin Shaker with your Cricut
Free Fall Pumpkin Patch Printable
Conclusion
I hope my tutorial helped you to make your own Cricut fall DIY door hanger. I hope you have fun making your fall front door hanger. If you enjoyed my blog post, please pin it!
[…] Cricut Fall DIY Door Hanger […]